 |
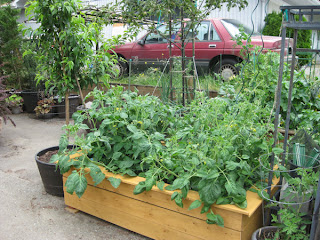
| Tomatoes in Sub-Irrigation Planter Bed |
I started the seeds pretty early and got a very high percentage of seedings, which was good and bad. I planted one plant of each in the SIPs and a second plant in the flower garden, so I could compare how the different plants did under different circumstances. Then I gave some away and tucked the extras into other flower beds, so we'd have alot of tomatoes for canning this fall.
 |
| Tomato Trellis mock up |
I know I should have staked them earlier, but I told myself I had more time and let them sneak up on me. The tomatoes are leaning over the sides of the SIP bed boxes, completely covering the kale and threatening the potatoes and nectarine tree.
 |
| Painting the trellis a bright color |
Time to add support - but I'm not sure how big the 'determinate' ones will get, so I tried to plan ahead this time. Half the tomatoes are determinate (4' tall??) and the other half are indeterminate and will likely grow so tall they cover the arbor we have set up for them.
Regardless of tomato type, it seemed like a good idea to add support that could extend vertically about 6' from the soil level.
This year we decided to try a 'sawhorse' approach, legs on each end, a long bar on the top and low on each side and support strings that the tomatoes could climb.
 |
| Adding a UV sealer coat |
We started with 2" x 2" boards that were cut to about 7', then secured at the top with a wood furring strip. This let the legs of the sawhorse move and lets us fold them up for storage and created a spot for the bamboo rail to fit on top.
Pine lumber seemed pretty bland, so we perked it up with a bright red paint and then a UV sealer.
The bamboo was already stained black, but I went over it again with a black stain that should protect the bamboo from the elements and extend it's usefullness.
Then the wind came up and blew the bamboo sticks over - 5 times. I did alot of damp cloth dabbing and some retouching, but we finally got everything done and dried so we could assemble the sawhorses above the SIP bed boxes.
 |
| Placing the trellis in a planter box |
It was so nice to finally haul our trellis sawhorses out to the garden and tuck them into the ends of the box. The legs fit snugly against the corners of the SIP bed box and are wedged into place by the SIPs inside the raised bed.
Then we added the first bamboo pole across the top. Things are moving along well at this point.
 |
| Attaching the bamboo side rails |
We added the bamboo side rails and the clamps. This allows the side rails to be secure but not clamped down. The slack lets you slide the side rails out if needed.
 |
| Adding the trellis guide lines |
The last part is to add the trellis lines. We used construction string, but in hindsight maybe the green twine would have been better. It would not have been so....obvious.
The trellis line needs to be long enough to tie to the top bamboo bar loosely, and then hang down loosely and tie to one of the side bamboo rails.
We ended up with about 10 -14 lines per box, which means 5 - 7 lines per tomato plant.
Next I spent alot of time weaving the lines through the tomatoes to keep them upright and allow for airflow.
 |
| Weaving tomatoes around the lines |
Now the real work begins - training the tomatoes. If I had been paying attention, I would have done this when the tomatoes were much smaller.
If this approach works well this year, we'll use it again next year. So far it looks like a good choice.
 |
| Early tomatoes |
While adding the tall indeterminate tomato climbing lines, I noticed that the Nikolayev Yellow Cherry already had tomato clusters on it ! This tomato has thin leaves and doesn't look particularly healthy for a tomato - I was expecting big bulky leaves like the others - but this little guy doesnt' seem to need alot of leaves to perform.
We're keeping an eye on this one and hope the cherry tomatoes taste as good as it says they will. The plant is already covered in blooms and we look forward to trying this one soon.
 |
| Tomato trellis in the garden |
We have 4 tomatoes per SIP bed. 1 box with 2 determinates (short) and 1 box with 2 indeterminates (very long/tall) on each side of the arbor.
 |
| Tomatoes have plenty of climbing room now |
The 8 tomato types we're trying this year. The tomato descriptions can be found on the Tomatofest website
1. Azoychka
2. Gold Dust
3. Heinz-9129
4. Japanese Black Trifele
5. Nikolayev Yellow Cherry
6. Sasha's Altai
7. Sunset Red Horizon
8. Zhefen Short
 |
| Finished trellis and guide lines |
Our newly trussed up tomatoes enjoying the sun.
I'll let you know how the experiment goes over the summer.
Looking really good!
ReplyDeleteWe are going to try this this weekend -- only difference is normal lumber for the rails ( can't find bamboo of that gauge ) and we have to secure the sawhorses to the bed because was have no inserts -- no biggy
ReplyDelete