Monday, August 26, 2013

More Tomato Taste Tests


My goodness the tomatoes are coming along enthusiastically this year! 

The great tomato experiment is having a wildly successful growing season and we're excited about how well the plants are producing.  We have had tons of Nicholayev Yellow Cherry tomatoes and the Sasha Altai and are now starting to look seriously at salsa as a meal option.


Last week our Azoychka's started to ripen up and the first of the Zefen Shorts have also turned pink and ready to eat.


Azoychka's are large, bright yellow tomatoes that taste great and are low acid.  Its not as sweet as the Nicholayev's, but it is very good as a sliced tomato.

We'll make a salsa out of it tomorrow and let you know how it tastes.

This one is small, but the others are much larger.  This is a vining tomato and it is covered in them.  They scare us a little bit, in truth.


The Zefen Shorts are large, pink when ripe and very good. 


Yeah, that's an apple on the right.  The tomato does not get bright red, but a soft blush color. 


Zefen Shorts are a more acidic than the others so far, with a nice tomatoey flavor and we look forward to trying some sauces with these. 


The plant is covered with tons of fat, large Zefens, so we shouldn't be short on sauce this year.

I think I put a few out in the flower bed, just in case we didn't get many tomotoes from a plant, so we may be up to our armpits in them soon.

Tuesday, August 13, 2013

Grandma's Relish Recipe to the Rescue

Ahhh Summer.  Its that time of year when we think of slowing down and relaxing and mother nature is picking up speed. 
 
This is that strange time when you are amazed at the amount of food that is starting to come out of your garden and the realization that there is no way you can eat all of this stuff as it comes ripe.  You'd swear its too early to start canning, but the cucumbers start to pile up alot more than you ever imagined.
 

This is also the time when that age old phrase "where did this new zucchini come from" is heard far and wide.
 

We are making that statement almost daily right now.  I thought I had outsmarted the evil zucchini plant and chosen one that was supposed to grow 'smaller' zucchini. 


OK, so what that REALLY means is that you will get 5 times more zucchinis, but they WILL be smaller than the normal kind you see, equaling an equal amount of zucchini over the course of the summer.
 
We're still up to our armpits in zucchini.  

No, we can't eat them all and they just keep piling up.

Visitors are not jumping up and down with glee when we try to pedal zucchini on them, either.  They are taking the japanese cucumbers we offer them, however, which has helped out immensely.
 
 
Out of desperation, I flipped through my recipe book and didn't come up with enough recipes to put a dent in the growing pile of zucchini. 
 
Then I looked through my Grandma's recipes...and there was a recipe for zucchini relish - a recipe that is probably quite a bit older than I am - and it used 10 cups of zucchini!  SCORE!!!!
 

I had one of those "country grandmas" that could cook great tasting meals with nearly nothing in the pantry.  She was also one of the best brook trout fisherman I've ever known. 

Grandma had a large collection of recipes that she carefully guarded over the years and sometimes we would be lucky enough to learn one or two of her recipes.  No one could ever 'get a copy of that recipe' out of Grandma, and I'm afraid I've picked up that same habit.  It was only after Grandma had died that Grandpa let me borrow the recipes so I could get them written down - which was an adventure of its own. 

Just in case I end up being the same way, my Mom has been very clear that SHE gets "The Black Box" (my recipes) when I die.  Hopefully it won't come to that.


So I dove into the zucchini relish recipe.  I prepped my 10 cups of zucchini, delighted with my good luck.  I started cooking the relish and decided to water the vegetable garden while it simmered. 
 

Tomatoes happy - check
Peppers happy - check
Blueberries ready - munch munch munch
Pick more cucumbers - check
Lift a zucchini leaf…..NOOOOOO!  Not MORE ZUCCHINI!!!

 
I finished going over the bushes and we took in the two new armloads of zucchini.  The relish is ready to put up in jars and we're back at square one with the zucchini pile.  Great. 

On the bright side, this zucchini relish is AMAZING!  I think we'll make some more soon...very soon.  

Sunday, August 11, 2013

August Tomato Update


Shade Gardener Blog Cherry TomatoOK, I'm sold on the heirloom tomatoes for cool coastal regions. 

We’ve been eating the Nikolayev Yellow Cherry tomatoes for a couple weeks now and those are SO GOOD.  The plant is covered in tomatoes and they're coming on slowly, but wow.  I'm not a big 'cherry tomato' fan, but we can't stop eating these.  Like fruity cherry tomatoes that you can't stop picking. 

Next year we'll plant several more of this kind to keep us in our new favorite 'candy tomatoes'.


Shade Gardener Blog Heirloom Tomatoes


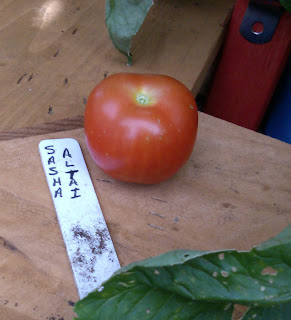
Yesterday we tried our first Sasha Altai tomato.  Also loaded with tomatoes, but only one was ready to eat.  It was very good and hard to describe.  Not as acidic, but not as sweet, either.  The tomatoes are described as having 'complex flavor'...which explains why we really couldn't describe the flavor.


August 10th
 
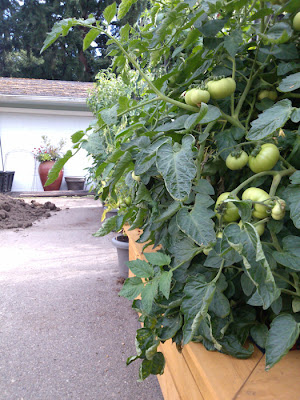
Summer is in high gear and the garden is busy being a garden.  As for the current growth/production of the tomatoes, well July was the month of"take off and grow", and August is the month of "get busy setting tons of fruit".The indeterminate tomatoes (vining ones) are still growing like crazy and also putting on more and more tomatoes.The plants have all shot up and have been covered with blossoms and now they are covered in tomatoes. 
 
Shade Gardener Blog - Sub-Irrigation Gardening


Shade Gardener Blog Sub-Irrigation Gardening


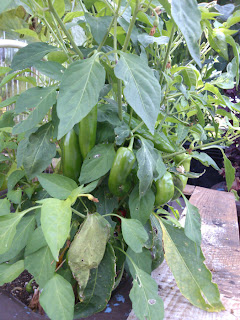
Even the peppers are taking off for the summer.  (Italian Roasters)


Shade Gardener Blog - Sub-Irrigation Gardening


Nikolayev Yellow Cherry has been such a surprise.  This is a 'semi-determinate', but we think of it as a short little guy - covered with the sweetest tomatoes you've ever tasted.  We check this one over for new orange tomatoes several times a day...just in case one or two are ready to eat.


Shade Gardener Blog - Sub-Irrigation Gardening 


Heinz 9129 is loaded with tomatoes already, which surprised me.  It will be one of the latest to come ripe, but I am very impressed with how much fruit it already has and how large they are.  The tomato is stocky, very healthy and full of fruit.  We look forward to trying them out and see how they taste.


Shade Gardener Blog - Sub-Irrigation Gardening


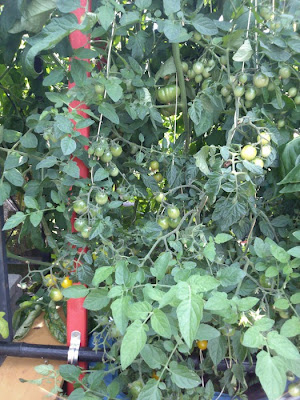
Azoychka is a vining tomato that grows and grows - and has tons of tomatoes on it.  These are on the outside of the plant as well as deep inside the shady middle.  I mistakenly thought that an heirloom may not produce as heavily as the hybrids do, but boy was I wrong on that one. 

Tuesday, August 6, 2013

Heirloom Tomato Experiment


We've all heard that you should try heirloom vegetables, right?  Well, I'm from the extreme cold, where the growing season is short and hybrids are your friend.  I'm not talking about the GMO hybrids, I mean the good old fashioned 'short season' hybrids.

Here in the Pacific Northwest, however, I have a temperate climate, nice weather and no severe freezing (when you're used to -20 to -40 in the winter, an occasional 10 degrees is nothing).  The downside, however, is that it is cool in the evenings and it rains until the 4th of July, which is not ideal tomato weather.  We didn't like how our local selection of 'Better Boy' or 'Early Girl' performed for us, so I started thinking about a cool weather tomato - and if they even exist.

Enter TomatoFest.com.  Their website listed more tomatoes than I ever imagined and even had a 'Cooler Coastal Collection' with 8 different kinds.  This collection looked good enough - tomatoes from Russia, China, Alaska and one from Heinz - all heirlooms and supposed to do great in our cool evening area.  So I took the plunge, got the seeds and started them early on (April), so I could set them out when it was warmer.

They all sounded great, we were skeptical, so I started 4 of each strain, just in case they didn't have a high germination rate.  Surprise!  All of them sprouted and we soon had little tomato plants crowding under our grow lights.

Here are the tomatoes included in our collection (by shortest time to tomatoes to longest):

Name
Height
Days
Season
Fruit Size
Color
From
Type
Sasha's Altai
Determinate
 
57
Early
5"
Bright Red
Southern Russia
Heirloom
Gold Dust
Determinate
 
62
Early
2"
Yellow-Orange
New Hampshire
Open Pollinated
Zhefen Short
Determinate
 
68
Early
3"
Pink
Zhengiiang China
Heirloom
Azoychka
Indeterminate:
 
70
Mid
3"
Yellow / Orange
Russia
Heirloom
Nikolayev Yellow Cherry
Semi-determinate:
 
71
Mid
Cherry
Bright Yellow
Russia
Heirloom
Sunset Red Horizon
Indeterminate
 
72
Mid
5"
Red
Southern Russia
Heirloom
Heinz-9129
Determinate:
 
73
Mid
3"
Bright Red
Ohio / Ontario
Open Pollinated
Japanese Black Trifele
Indeterminate
 
81
Late
6"
Black Purple
Russia
Heirloom

Here's what I did when I planted them:

Box Prep
Potting soil
Sub-irrigation planter  (see my other posts for info on this one)
1 cup of lime in the top  4" of soil
2 tomatoes per box

Layout in the garden
Street 1
Box 1
Zefen/Heinz
Box 2
Peppers
Box 3
Azoy/Nicholai
Arbor
Box 1
Sunset/Japanese
Box 2
Red Bore Kale
Box 3
Gold Dust/Sasha
Garage

Planting Time - in each planting hole
Small handful of Cascade Minerals
Small handful of HuMagic (Hendrikus Organics)
Small handful of Organabloom (Hendrikus Organics)

1st weekend in June
Spray-N-Grow Micronutrient Spray

1st weekend in July
Spray-N-Grow Micronutrient Spray

1st weekend in August
Spray-N-Grow Micronutrient Spray

Water sub -irrigation planter daily

Progress:
March started seeds indoors


April 9 - moved tomatoes to larger containers


May planting time in containers under cover.  Moved out last weekend in May.
June 5


June 27


July 5 - Trellises added


July 15


I'll add update posts as the summer progresses. 

Happy Gardening!


Tuesday, July 9, 2013

Overhead / Vertical Tomato Trellis - Let Them Reach for the Sky

This year I'm doing a few tomato experiments. I wanted to find 'the perfect tomato' for us, so I decided to try a bunch of different heirloom tomatoes that were suitable for the Pacific Northwest and see which ones we liked the best. I got a seed collection of 8 'cooler coastal' varieties from Tomatofest.com that sounded promising.


Tomatoes in sub-irrigation planter bed
Tomatoes in Sub-Irrigation Planter Bed

I started the seeds pretty early and got a very high percentage of seedings, which was good and bad.  I planted one plant of each in the SIPs and a second plant in the flower garden, so I could compare how the different plants did under different circumstances.  Then I gave some away and tucked the extras into other flower beds,  so we'd have alot of tomatoes for canning this fall.


Tomato trellis
Tomato Trellis mock up
It's now July and the tomatoes are getting out of control. 


I know I should have staked them earlier, but I told myself I had more time and let them sneak up on me.  The tomatoes are leaning over the sides of the SIP bed boxes, completely covering the kale and threatening the potatoes and nectarine tree.


Adding paint to the trellis
Painting the trellis a bright color


Time to add support - but I'm not sure how big the 'determinate' ones will get, so I tried to plan ahead this time.  Half the tomatoes are determinate (4' tall??) and the other half are indeterminate and will likely grow so tall they cover the arbor we have set up for them. 

Regardless of tomato type, it seemed like a good idea to add support that could extend vertically about 6' from the soil level.

This year we decided to try a 'sawhorse' approach, legs on each end, a long bar on the top and low on each side and support strings that the tomatoes could climb.


Trellis legs and bamboo rails get sealer
Adding a UV sealer coat

We started with 2" x 2" boards that were cut to about 7', then secured at the top with a wood furring strip. This let the legs of the sawhorse move and lets us fold them up for storage and created a spot for the bamboo rail to fit on top.

Pine lumber seemed pretty bland, so we perked it up with a bright red paint and then a UV sealer.

The bamboo was already stained black, but I went over it again with a black stain that should protect the bamboo from the elements and extend it's usefullness.

Then the wind came up and blew the bamboo sticks over - 5 times.  I did alot of damp cloth dabbing and some retouching, but we finally got everything done and dried so we could assemble the sawhorses above the SIP bed boxes.

Setting the trellis legs in the planter
Placing the trellis in a planter box


It was so nice to finally haul our trellis sawhorses out to the garden and tuck them into the ends of the box.  The legs fit snugly against the corners of the SIP bed box and are wedged into place by the SIPs inside the raised bed.

Then we added the first bamboo pole across the top.  Things are moving along well at this point.


Attaching the bamboo side rails


We added the bamboo side rails and the clamps.  This allows the side rails to be secure but not clamped down.  The slack lets you slide the side rails out if needed.


Trellis string lines
Adding the trellis guide lines


The last part is to add the trellis lines.  We used construction string, but in hindsight maybe the green twine would have been better.  It would not have been so....obvious.


The trellis line needs to be long enough to tie to the top bamboo bar loosely, and then hang down loosely and tie to one of the side bamboo rails.


We ended up with about 10 -14 lines per box, which means 5 - 7 lines per tomato plant.
Next I spent alot of time weaving the lines through the tomatoes to keep them upright and allow for airflow.


Tomatoes on trellis lines
Weaving tomatoes around the lines


Now the real work begins - training the tomatoes.  If I had been paying attention, I would have done this when the tomatoes were much smaller. 

If this approach works well this year, we'll use it again next year.  So far it looks like a good choice.


Early tomatoes


While adding the tall indeterminate tomato climbing lines, I noticed that the Nikolayev Yellow Cherry already had tomato clusters on it !  This tomato has thin leaves and doesn't look particularly healthy for a tomato - I was expecting big bulky leaves like the others - but this little guy doesnt' seem to need alot of leaves to perform.


We're keeping an eye on this one and hope the cherry tomatoes taste as good as it says they will.  The plant is already covered in blooms and we look forward to trying this one soon.


Tomato trellis in the garden


We have 4 tomatoes per SIP bed. 1 box with 2 determinates (short) and 1 box with 2 indeterminates (very long/tall) on each side of the arbor.


Tomatoes have plenty of climbing room now


The 8 tomato types we're trying this year.  The tomato descriptions can be found on the Tomatofest website

1. Azoychka
2. Gold Dust    
3. Heinz-9129
4. Japanese Black Trifele
5. Nikolayev Yellow Cherry
6. Sasha's Altai
7. Sunset Red Horizon
8. Zhefen Short


Finished trellis and guide lines


Our newly trussed up tomatoes enjoying the sun.


I'll let you know how the experiment goes over the summer.

Saturday, June 22, 2013

How to make Sub-Irrigation Planters (SIPs)


Sub-Irrigation Planters (SIPs) are portable, self-watering containers that can be built in any number of sizes to accommodate different vegetable types and sizes. 


The basic Sub-Irrigation Planter has three layers - the bottom layer is water, the middle layer is air and the top layer is soil.  The top layer has two pockets that extend down into the water, wicking the water up into the soil as needed.  Because plants need oxygen to their roots, you don't want the soil to sit directly in the water.  The planter has a floor that sits above the water line, providing an air layer between the soil and the water that provides the needed oxygenation to the roots and prevents the plants from drowning.

You only need two water wicking pockets to keep the plants watered appropriately.
 
Sub-Irrigation Planters (SIPs) are pretty easy to do yourself.  To make your own, you will need the following items:

1 - 30 gallon plastic storage tote (we use sterilite because they are more rigid) $11 each
1 - 10 foot length of 4" flexible perforated pipe (can make 2 ½ boxes with 1 pipe)  $6
1 - 1" plastic tube (thin wall)  $2
Landscape cloth
Scissors
X-acto Knife
Drill with 2 drill bits.  7/32” and ½”
Small saw for cutting plastic tube
Brown plastic paint (Krylon)  $4
1 cubic feet potting soil  (big bag) $7 - $12


Start with a 30 gallon storage tote. We like to use the Sterilite totes because they are more rigid. Rubbermade totes are flexible and will not hold their shape well.
Remove the lid and set it aside for now.
 
Measure the length of the tote across the top and inside the bottom. Our 30 gallon storage totes are about 29”tall across the top. They are also about25” long in the bottom of them.


Using the measurements across the inside bottom, take a pair of scissors and cut your flexible perforated pipe into sections.  You will need to cut the following 3 pieces:

2 – 25” pieces  (bottom inside length)
1 – 15” piece (bottom inside length minus 10”)


Perforated pipe has holes in it that allows the water to flow in and around the pipes.  This provides support for the floor while allowing the water to flow to all areas in the water reservoir.


After the 3 pieces are cut, lay them in the bottom of the storage tote.  It’s ok if they are a little tight.
 

The short piece should be on one side and placed so there are 5” gaps on each end of the pipe.  This is where the water wicks will be located. 
 

Next we work on the floor that lays on top of the perf pipe.


Set the lid on a hard surface that you can cut on.  I usually use the ground or our old picnic table.  You are going to cut all the way through, so you will scratch the surface below the lid.


If your lid has an indentation in it like ours do, use that as a guideline for cutting.  If not, then make a line 3" in from the edge and cut the lid center out using a sharp X-acto knife.


I have found that it works best to do this type of cut in two passes - one pass to score the lid and the second pass to actually cut through the lid. 


Cut all the way around the lid so the center comes out. 
 

Set the outer piece aside.  It will be painted and put back on the box top later.


Keep the center piece. We will continue to work on this piece to make the floor of the SIP.   
 
 
With a sharpie marker, draw two  4" x 4" square corners on one long side of the floor piece. 


This is only done on one side of the floor.  When you are done, there should be two squares drawn on the floor piece.


Using an X-acto knife, cut out the two corner pieces from the floor piece. 
 

This will be the pockets in the floor that create the water wick pockets.


Try out the floor in the planter.  The base should sit directly over the perf pipe and you should be able to see directly to the bottom of the planter where the water wick pockets are located.
Next we drill vent holes in the floor with a ½” drill bit.


I place the floor piece on the ground and stand on it for support, then I drill holes about 4” apart all over the base. Its ok if this is not perfect, you are creating airflow holes. 


Next we cut the 1” stand pipe that lets us water the planter from above.  The pipe should stick up about 3” from the top of the planter.  We cut ours about 18” long.
 
After you’ve cut the pipe, drill water holes in the end of the pipe using the 7/32” drill bit.  This helps the water flow into the reservoir when you are topping it off.

Place the stand pipe in the OPPOSITE side of the box that the pockets are on.  If the floor is too tight, cut a notch in the floor to accommodate the stand pipe.

(this photo is from our tree planters, which are larger)


At this point we add 5 holes for water overflow and air flow.  The holes and the stand pipe go on the opposite side of the planter from the wicking pockets.  


Using your sharpie marker and the diagram below, mark the 5 holes, 3 on the bottom and 2 on the top. 

The 3 water overflow holes should be placed 3” from the bottom of the planter. 
The 2 air holes should be 4” from the bottom of the planter.

Use your 7/32” drill bit to drill these holes.  They don’t need to be very big to be effective.


At this point I stop and spray paint the outside of the box, the lid, the stand pipe and the inner top of the box with a spray paint made for plastic.  Krylon makes a great dark brown one that looks like dirt and makes your planters blend in.


Next we cut our ground cloth and add it into the planter.  We use the kind that is about 32” wide and allows water to pass through it, so the  water wicking pockets will work properly.
  

Measure out about 6’ long, and lay it in the bottom of the planter, wrapping it loosely up the sides.


Now press your hands into the wicking holes, making pockets with the ground cloth.  Make sure the ground cloth wraps up the sides of the wicking pockets, so the dirt does not escape into the bottom and become mud.

 
This will keep the soil separated from the water, but creates the water wick pockets that can absorb water through the holes in the ground fabric.  

The last step is to add soil to the box and get it ready for planting.  I use a potting soil in the box, but your own soil/compost mix will also work well. 


ADDING SOIL 
You can fill this 30 gallon SIP box with a 2 cubic foot bag of potting soil.
 
 
Slowly fill the box ¼ full and press the soil down into the water wicking pockets.  Continue filling the box to half full of soil and then stop and lightly water the soil to activate the wicking. Put the rest of the soil in the box and water the soil again. 
 
A water filled SIP box is heavy - about 50 pounds or more.  Its alot easier to set the box in the location you’d like it in and then water the soil well to saturate it.  Focus on spraying water over the wicking pockets, so the soild is wet from above as well as from below.  After the box is well watered, use the stand pipe to fill the box until water flows out of the lower set of holes.

 
PREP FOR PLANTING

I like to add a few things to the soil before I add my plants or seeds. 
1.  Add in a cup or two of dolamite lime.  This is a powdered lime with magnesium in it.  Your plants will love it.  Mix it into the top 4 inches of the soil.
2.  I also mix a 10-10-10 fertilizer in the top 1" layer of soil and plant with desired vegetables. 

 
After that I plant my seeds in the box the same as I plant them in the ground or put in plants if I've started them early or bought them pre-started.
 
**I've been trying out a few products from Hendrikus Organics this year and they seem to be doing well with the plants.  In addition to the things I do above, I also add a small handful of Humagic and Organibloom in the planting hole and place the new plant on top of it.  I'll keep you posted on how well they do over the summer, but so far things are going well.
 
From this point the process is pretty simple.  Water the boxes every day and wait for things to grow in and start producing food for you.
 
I keep track of how long it takes to 'top off' a box by counting while I'm filling.  You can use this method to track how quickly your plants are taking up water as they hit their growth spurts or deal with the summer heat.
 
Next I'll post more information on how many of each plant you can put in this sized Sub-Irrigation Planter.